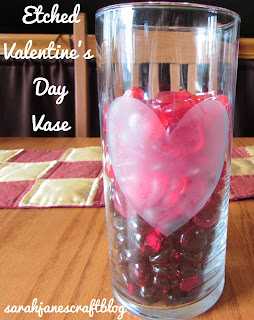
Etched Glass Valentine's Day Vase
On my last trip to Walmart, I picked up a couple of these inexpensive (97 cents) glass cylinder vases. I figured I could whip up some cute Valentine's Day decoration. After a little thought, I remembered I had a jar of Armour Etch in my craft stash that I hadn't used yet. I was itching to do an etching. So here goes nothing!
I gathered some contact paper (it doesn't need to be clear, but I keep the clear stuff around for covering books and what not), a sharp scissors, a foam brush, the armour etch, and the glass cylinders. You'll also need a covered surface to work on and some gloves (vinyl, dish gloves, etc...).
The last time I etched glass was for a 4-H project in junior high, so I knew I wanted to keep it simple. Also, I don't have a cutting machine (like cricut or silhouette) to make this process a snap. So, I went with a heart. I cut two pieces of contact paper about the length of the vases and stacked them on top of each other and folded them in half to cut out the heart. I cleaned them up a little with my scissors after I separated the two sheets, but cutting them on top of each other--stacked--allowed for them to be in the same spots on the contact paper and the same size so the two stencils would match. If you're not confident in your heart cutting abilities, print out a template from a web search and trace around it.
Next comes the hardest part of the project--no not getting the stupid paper to peel off the back of the contact paper, though that can sometimes be a pain--but getting the contact paper on to the vase, straight, without bubbles, and with the edges all securely in place. I found that applying the contact paper from left to right instead of from top to bottom worked better on this surface with this cut out. I lined the top edge of the contact paper along the top edge of the vase on both so the hearts would be oriented in pretty much the same place on each. Then I burnished the edge of the heart with my thumb nail (you could also use a spoon or plastic butter knife). If the edges aren't securely in place, the acid etch will bleed along the edge and you won't get a clean line.
After you're sure the stencils are securely in place, then you can start putting the goopy acid onto your project. I lined my kitchen sink with some foil and put a roll of foil in the center to keep the vases from rolling. If I was working with a flat project, I would probably just put down some parchment or a few layers of newspapers on the kitchen table. Make sure to wear gloves while applying the acid so you don't get burned by any drips. I used a foam brush to apply the armour etch, but you could also use a craft stick or piece of cardboard--it doesn't need to be super precise, just evenly spread.
After you have your design completely covered, let it sit. The jar doesn't give a set time, but other tutorials online estimated letting the cream set about 5 minutes. I set a timer after I had them completely covered. If you're working on a round surface like I was, check for drips to make sure that you don't accidentally etch uncovered parts of the vase.
After 5 minutes, rinse the acid off. Use your gloved hands to gently rub the acid cream off of the vase. Make sure you rinse all of the cream off of your project. Leave the stencil on until you're certain all the armour etch has been rinsed off of the project. Wipe it dry and then peel away your contact paper.
This was a pretty quick and inexpensive project (especially if you already have a jar of armour etch in your craft supplies). The great thing about using the etching cream to make these is that unlike similar craft projects that use paint...this is permanent, won't scratch off, and can be washed (even in the dishwasher). I'm glad I got that jar of armour etch out of storage--it has inspired me to come up with more ways to use it.
Note: Glass etch creams like Armour Etch are acids--they can burn and damage surfaces--so be sure to read the label and protect yourself accordingly, and if you get it on anything you shouldn't--use lots of water to dilute it.


Comments
Post a Comment